Self-tapes are becoming increasingly more popular, however, we see so many that are poor quality, too large file size frustatingly, multiple scenes are provided as separate files.
We have provided simple guidelines below to help you produce great self-tapes. It’s not about trying to create Oscar winning cinematography, these tips will help you ensure that your tape is at least as good quality as your acting for camera.
Modern Camera phones Tablets will usually be sufficient have the added advantage of using standard formats for recording that can easily be imported into most editing software if required.
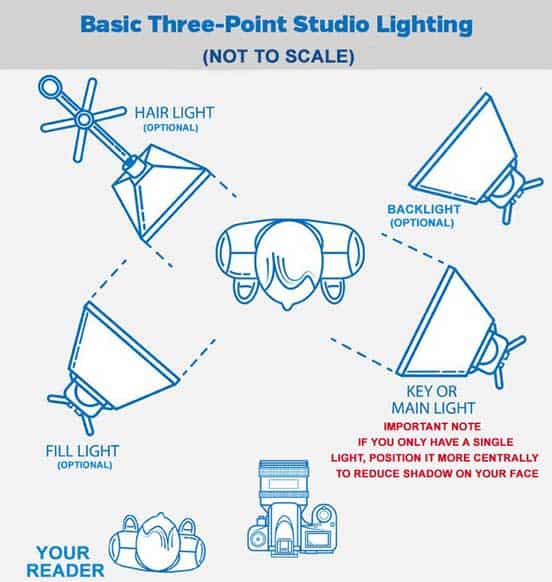
- We need to see your face. There’s no need for expensive lighting equipment. Find basic lighting around your house create a set up similar to that on set or stage: principal light on you, also known as a key light, a fill light, a back (hair) light to sculpt separate you from your background (fill light back light aren’t necessary). If you want to add a background light this is used to eliminate shadows provide additional depth. It should look something like the sample picture below.
- Always film LANDSCAPE not portrait, Computer monitors, TV screens Cinema screens are landscape. If you film portrait mode your self-tape might be displayed on it’s side certain viewers.
- There’s nothing wrong with a white background, but it can read flat or stark. Try a royal blue background or grey background which will make you stout more. You can use a bed sheet or table cloth, most importantly keep the background neutral. The director when viewing your tape should be concentrating on you not trying to identify the artist who painted the picture on the wall behind you.
- Whatever camera, smart phone or tablet you use, your device should zoom in enough to limit unnecessary background. Create a controlled enough environment where the camera can pick up your voice without unnecessary noise, like traffic neighbours.
- It’s helpful to have your reader at eye level near to your camera. Make sure your reader is instructed to speak with a softer vocal volume, as he or she may be closer to the mic than you are. In an ideal world your reader will be another actor, if no one is available to read for you then consider pre-recording the other lines yourself read opposite those. (not ideal but better than nothing you can’t complain the reader wasn’t giving you what you wanted!)
- If you’re asked to provide a slate or ident, keep it open inviting. This is the first thing we’ll see so let’s see the real you, when you say “Hi my name is_____” we should be looking forward to your scenes.
- Avoid talking head or exaggerated facial features. It reads that you’re not connected to the moment or you “think” you need to work harder, but ultimately there’s a lack of connection to your character. Stay in your moment. Whether your character is active or still, he or she lives in a whole body. And that whole body needs to be engaged. We’ll register it even in the tight shot of your audition.
- Nuance is sometimes missed in the audition room, but enjoyed later when we review tape. Allow your character to live in-between the written lines. Resist dropping out when flipping pages. Know what you want from the other character, keep your interesting story moving forward.
- Draw us in with your performance
Sending your files to the Casting Director
- Most Importantly, if you are asked to tape more than 1 scene, edit them all together into a single file. If you send 3 scenes as 3 separate links the viewer might watch the first one perhaps think it’s not what they are looking for without watching the other 2 links. If you send all scenes as a single file/upload there is a greater chance of all scenes being watched.
- There is lots of free software available to assist you editing your tapes. Google “free video editing software”, if you can’t find any then wevideo.com is a FREE online video editor that has all the basic features that you will need.
- Once you have edited your tape have a look at the file size, if it’s anything more than 20mb it could take ages to upload (download) so consider shrinking the file size. Mp4 files are much smaller than .mov or .avi files. ‘Handbrake’ is free software for the PC Mac that will reduce the size of your file withour noticbly affecting the quality of the video. I have just put a 181mb .mov file through ‘Handbrake’ reduced it to 11mb.
- Unless specifically instructed otherwise, always upload your self-tapes to Vimeo (vimeo.com) make them ‘private’ or password protected. Be aware if the Casting Director has requested a downloadable copy, this feature isn’t available in the free version of Vimeo, under these circumstances consider using wetransfer.com or even uploading to your media bin in Casting Networks (assuming you have a profile). Most Casting Directors don’t like dropbox or any other service where they will be required to create an account before viewing or downloading your tape. The easier you make it for the Casting Director/Director/Producer to view your tape, the greater the chance of it being watched more than once.
Good luck with your self-tapes.